
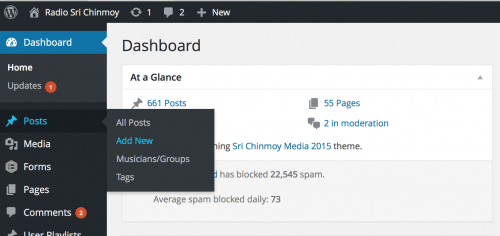
As soon as you log in, you are taken to the Dashboard, with all your recent posts, some options and help pages.
To add audio to the site, you take the following steps, which are explained in more detail further down:
- Step 1: Add a new post
- Step 2: Add a title and save your post as a draft (this creates a folder on the site for uploading tracks)
- Step 3: Add the audio tracks
- Step 4: Press the ‘Save draft’ button again (the site will try to automatically find out information about the tracks you uploaded and save it)
- Step 5: If necessary, edit the information about each track, and rearrange tracks
- Step 6. Add information about the recording
- Step 7. Add featured image, excerpt and categories
Step 1: Add a new post
Every music recording on Radio Sri Chinmoy is uploaded as part of a ‘post’ – a page where there is a music player to play files, and a description of what the recording is all about. To add a new post, you can click on either one of the two links on the dashboard. Note that the look of the dashboard is updated from time to time, so the screenshots might look a little different than what you see below, but the basic layout is the same.
Step 2: Add title and save as draft
Once you add a new post, you will be taken to an edit page like the one shown below.
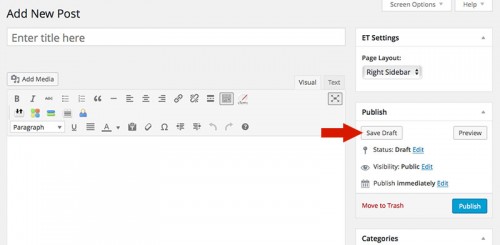
You will need to add a title and save your post before you can upload any of your tracks. It is best to press ‘Save draft’ so that the page is not immediately public.
Step 3. Adding files
(Note: As part of recent changes to Radio site, we now upload audio files the same way we have been uploading images to the page. The following text is just an explanation of how we do that)
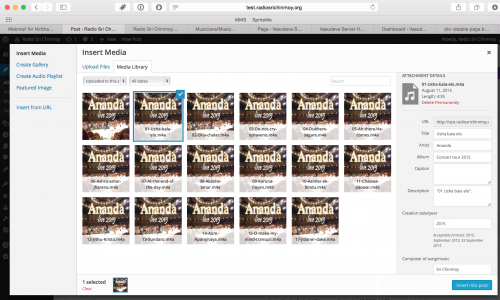
Once the post is saved, you can then upload the media files, by clicking on the ‘Add media’ link above the text editor.
A window will open up, with a list of all recent files opened so far. You can upload files in 1 of 2 ways:
- Click on the Upload files tab, hit the big Upload Files button and choose your files.
- Or: simply drag the files into the upload window and upload will begin immediately.
The upload will obviously take a while depending on the size of the file, but you will be able to track the progress of the file upload. When the files are uploaded, you will see all your track details on the right hand side – Name, Description, Artist, Album, Date and Composer.
Important: When the files are added, don’t press the add to post button in the bottom right corner – instead press the ‘x’ button in the top right corner to close the window and go back to the edit page.
Step 4: Save Draft and get file information
once the files are uploaded, press Save Draft again. When saving, the site will attempt to pull in all the file info (Name, Description, Artist, Album, Date and Composer) from information embedded in the track itself – often this information has been added already in iTunes or some other program.
Step 5: Change file information and rearrange files
Rearrange files
Select Add media and select ‘Uploaded to this post‘ in the dropdown. This will show all the audio files you uploaded. You can rearrange the order of the tracks by simple drag and drop.
Changing file information
You can change the file info (Name, Description, Artist, Album, Date and Composer) by selecting the track and editing the info on the right hand side. There are a couple of things to watch out for:
- After editing a field, it is best to click inside another field (even if you don’t intend to edit it) so the automatic saving kicks in.
- If you leave an empty field, the site will try to fill it in from the information that comes embedded in the file. This can be problematic if (for example) a song has been wrongly attributed to Sri Chinmoy as the composer. Instead of leaving it empty, you should instead properly attribute the right person as the composer. Otherwise, when the post is saved, the site will once again attribute Sri Chinmoy as the composer from the file info.
- Again: dont press the ‘Insert into post’ button!
Step 6: Add description of content
This goes in the content field just below the title. Try to give visitors an idea of what they can expect when they press the play button – eg what style of music, are they instrumental or solo, male or female etc, where the performers come from, and any other information you think the visitors to the site might find useful.
Step 7: Adding featured image, categories tags etc.
see: Best practices for adding metadata (eg featured images, categories etc) to posts on Radio and TV