
There are a few sections on this page:
The important things:
- Adding images to your site
- Keeping images organised
- How to align images to left or right of text
- Adding a caption
- Moving an image from one part of the page to another
- Choosing images from other sections of the site
Adding images to your page
A simpler version of this explanation was given on the adding content page. Unfortunately, right now adding images is more complicated than it needs to be, hopefully that is something we can work on.
- Click on the image button
 . This will display a dialogue with a Browse Server button. Clicking on this will show your image filesystem i.e the images already uploaded on the site, arranged into folders.
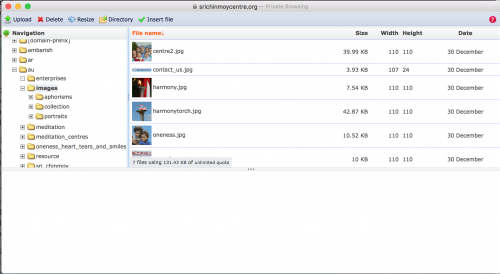
- On the left you can choose where in the file system you would like to put an image. There is a folder for each country site (eg /ca for Canada). Inside this folder, you can upload and delete images. You can browse images in other country folders, but you can’t add them there.
- To upload an image, use the Upload button and select the image from your desktop. To add the image to your page press the Insert file button.
- You will then be taken back to the original window, where you have the chance to align the image to the left or the right, or to add a caption
Aligning existing images
Right click on the image and select ‘Image properties’ – the window will come up and you can select left or right align
Tip – if the image you want to upload is less then 40% of the width of the page, you should left align or right align it. Otherwise, the image will expand to full width. (On full-width pages, there is only the chance to right align images)
Adding a caption
Select captioned image, and then OK. The window will then close and you will see ‘Caption text’ below the image – edit this to provide the caption
Keeping Images Organised.
On the site, images are organised in a folder system. You may want to create more subdirectories to organize your images. As an example, suppose on the Canadian site you would like to create subfolders inside the images directory
- ca/images/meditation
- ca/images/people
- ca/images/size-250
To do this, navigate to the subdirectory /ca/images. Then click on the Manage directories button, and type in a name (for example small) then click Add. You can now add images into this subdirectory: /ca/images/small. You can also use the Manage directories button to remove directories
Choosing Images from Other Sections of the Site
- Suppose you like images in the UK section. You can browse in the left to files/uk/images. You can then select the image you want, press Insert file, and use it in your page.
- Example: Let’s say you like the lotus image on http://uk.srichinmoycentre.org/meditation. To see where the image is located: right-click on the image and then select view image. This shows the image is at: http://uk.srichinmoycentre.org/files/uk/images/flower.jpg. Then, when you are editing your page, you can go into the filesystem, navigate to /uk/images and send this image to your page.
Moving images from one part of the page to another
Right click on the image – you will see a ‘cut/copy/paste’ menu. Cut the image. (Alternatively you can click on the image and press Ctrl-X or Cmd-X)
Then click on the place where you want to paste the image and press Ctrl-V (Windows) or Command-V (Mac)
Resizing and Cropping Images
- You will achieve better results if you resize and crop images using an image editor like Photoshop or Pixlr before you add them to the site. However, the file manager provides basic functionality for resizing.
- To resize images, select the image, press the Resize button and select the width and height. If you wish to change the width and keep the proportions, just change the width and then click in the height box – the new height will automatically be calculated.
Advanced Notes for Images
- Image Size To increase the speed of page load, it is important to keep the size of images low. When adding new images the size should be less than 100k.
- Size Limits There is a limit on the size of image you can upload: if it is bigger than a certain size, it will be resized automatically. For the Centre and Races sites, the limit is 900 x 600 pixels.
- JPG Suffix Some images in our old Plone site (pre 2006) were added without the .jpg suffix at the end. This means the text editor can’t caclulate their size and will add them as a link instead of an image.
- Linking Images. You can make a link into an image. Just click on an image and then select the link button. For example, the above image links to the main help page. Visitors often expect images to be links.
Use Gallery Images
- We are free to use any of the thousands of beautiful pictures available at the Sri Chinmoy Centre Gallery. Please try to use these instead of photos from some external site. However, if you do want to use an image from another site please make sure you have the legal right to do so.
- If you want to use gallery images, the best thing is to download the image and then reupload it to the site.