Editing the event page
The event pages are the backbone of the site – in a way they are almost like mini-homepages in themselves. Our aim was to create a ‘one-stop shop’ where visitors can see everything they need at a glance. There are quite a few different entry fields.
Creating a new event page: Right now you need to ask Tejvan or Nirbhasa to create it, and then you can edit it. Please don’t re-title another event page in order to have a new event page
Here is an initial checklist to getting your event page up and running:
- Add dates for your event
- Add basic information to get your page up and running
- Create the large banner image for the top of the page
- Add additional information such as featured bullet points, contact info, certification info etc
- Add the race details – e.g. directions, safety info, etc
- Attach past results to your event
Getting the page up and running
The following information is displayed in the blue box over the big banner image, and is generally the first thing that people see.
- Title: there is no need to include the date here, as the date will be displayed beside the race name everywhere.
- Opening Description: This is displayed just below the title – it is basically a one line summary of the race that hopefully will appeal to visitors and encourage them to dive deeper into the page. This description is probably the first line of text visitors will see, so it is worthwhile spending a little time getting it right
- Date and location
- Links to page sections (see video on right): Because we are trying to put a lot of the information about on one page, the event page can get quite big! So it is important that visitors can quickly get to important sections of the page. As a rule of thumb, 80% of visitors will be interested in the most relevant 20% of the content – so with these links, you should think about ‘What will the visitors to this page most want to see?’ and then direct them there.
One important thing to clear up: these links will only take you to different points within the page, not to other pages!
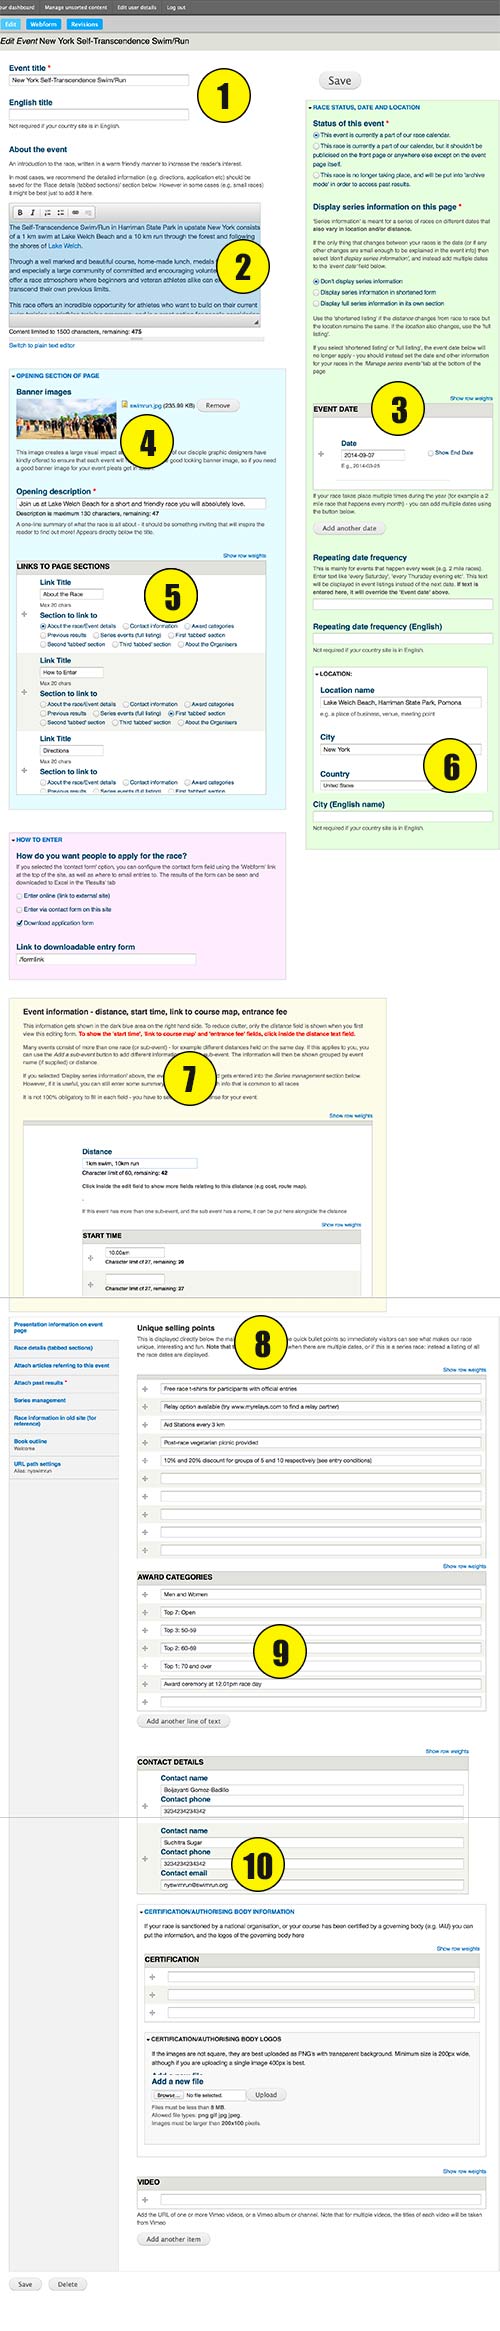
Adding date(s) for your Event
The dates can be added in the green section on the right hand side. We have tried to adapt this page to deal with the many types of events we organise worldwide:
Single date
A majority of our events we organise take place on a single day, and the date can be specified by a single entry in the ‘Event date’ field.
For multi day events, you can check the ‘Show end date‘ box and add the end date
Events that happen multiple times per year
You can also use the event page as a single ‘landing’ page for events with the same distance & location that happen multiple times per year. Examples: Prague 2 mile race, Auckland Mid-Year Series. In this case, multiple dates can be added to the ‘Event date’ field by pressing the ‘Add another date’ button (see video)
Or – if your event is a quasi-informal one takes place every week (e.g. a 2 mile race), you can just enter the frequency in the ‘Repeating date frequency’ section e.g. ‘every Saturday’.
Notes:
- There is currently a small bug where when you press the ‘Add another date’ button to add more dates, nothing seems to happen – press it again, and another date field should appear as expected)
- If your event consists of a series of races that take place over different distances or locations, then tees are dealt with differently! Instead, you can tick the ‘Display Series Information‘ box and fill in the dates/distances ect in the Series Management tab at the bottom of the page. Examples of series events are London Battersea Park Race Series and the Sydney Race series. These are different from races like the Prague 2 mile race because the races also vary in distance and/or location.
Entry buttons
As in the old site we have the ‘enter online‘ and ‘download entry form‘ buttons. We now also have the ability to enter through a contact form on the site.
The contact form can be edited using the ‘Webform‘ link at the top of the page. You can add fields to the form, as well as specify an email address to send entries to. See help page on how to configure the form.
Event information (Distance, start time, course map, entry fee)
- When viewed by visitors, this information will appear in the blue bar on the right hand side
- Many races have more than one sub-event – you can optionally add more sub-events, and the information will appear grouped by sub-event.
- To reduce clutter on the edit page, we have hidden all the fields initially except the distance field. Clicking on the distance field will automatically open up the rest of the fields for that subsection.
A note on the ‘About the event’ section
Our idea when designing the site was that this section would be a warm, friendly introduction to the race, and the technical nitty-gritty (e.g. directions, safety info, course info) would be further on down the page. When looking at the old site, we saw that many race editors were great at putting in all the technical information for the site such as directions and safety information, but many pages were not as good about getting people inspired about the race in the first place. If people are inspired, then they will take the time to find out everything else they need to know.
It is important to note that this page might be the first page that people see on our site (they may very well come directly to this event page instead of via the homepage), so it would be great if they came away with some sense of who we are, even if they cannot come to the race. You could naturally work in nice things like little tidbits of race history, or Sri Chinmoy’s philosophy of service and self-transcendence that underly our races.
However – this is just our suggestion! It might not be compatible with the realities that you, as a race director, face in putting on your race. For example: smaller races might not need to have a separate section for race information below, and can put the introduction and technical info all in this place. In deciding what to put in, one also has to consider the overall look of the page – it is good to keep the white and blue sections as equal as we can. (For example, when testing the event pages for a couple of races, we moved the ‘award categories’ info out of the blue section, and put it either in this section or in the tabbed section below)
Once you have done this much, we’d encourage you to save the page. As we said, there is quite a bit to this page, but even by doing the above steps, you have done a significant amount towards creating your event!
Banner image
- This image gives the page a real visual impact. To be honest, finding and adding this image probably the most difficult part of creating the event page. However it is something you will only need to do once, and then the page looks great for years! Also – we do have experienced photo editors who are willing to help! If you can send us photos or gallery links to images you think would be suitable, we can certainly do the rest.
- The uploaded size will be 2500 x 1000 pixels: we need it this big so it will not be blurry on large screens.
- However – on smaller screens, the website will automatically generate smaller and less resource intensive pictures.
There are 2 important considerations when choosing the banner image:
- The images will be resized and slightly cropped in different ways depending on the screen size, so there shouldn’t be too much action at the edges.
- The main focus of the action should be on the right hand side of the image (maybe 1/3 of the way in from the end) and about half way down. Try to avoid somebody’s head getting chopped off by the blue title box 🙂
Additional information
- featured bullet points, race video, newsletter (goes in white section)
- contact details, award categories, certification info (goes in blue section)
Adding this information is not obligatory, but it can definitely make your page look nicer! When deciding whether or not to include a particular section, one consideration is how the page will look – it is good to have the white and blue sections roughly equal height (or at least the white section should be longer than the blue section). So you might have to adapt to keep the page looking nice. For example – sometimes we have kept the ‘Award categories’ empty and instead added that information to the ‘About the event’ or ‘Race details’ sections, so the blue section would not get too long.
In this section:
Featured bullet points.
We would definitely recommend adding this! These – immediately people can see at a glance what makes our races different. Foir a good example, take a look at the NY Swim Run Page
Contact information
Can enter name, phone, email (you can leave out any of these if you need). Also your email addresses will be protected against spam.
Certification information
This can be a good thing to add if you need to emphasise that your racetrack has IAU bronze standard, or if your race is sanctioned by national federation
Race details
- This section is meant for detailed information such as Entry details, Directions, Accommodation, Course Records, Safety Information and any other details associated with the race.
- This field consists of multiple ‘sections’ with one or more ‘tabs’. If only one tab is added per section, then tabs are not displayed and the the section title and tab text are displayed below each other (in this case, we would suggest omitting the tab title)
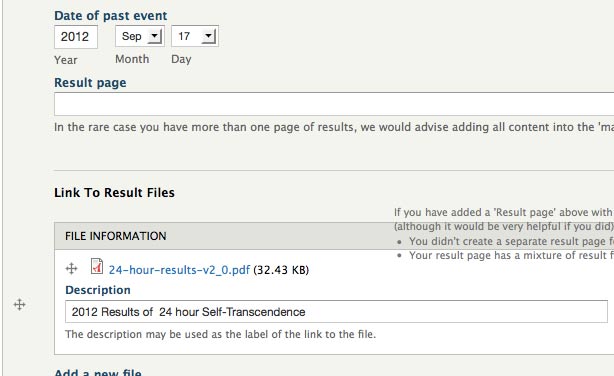
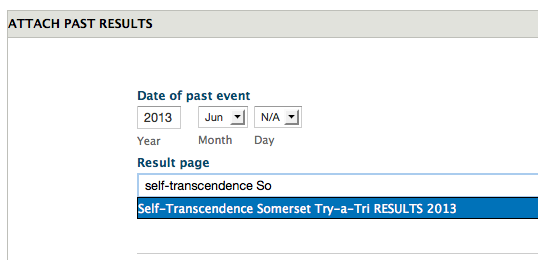
Past results
- Note: if you created pages for your results, it could be faster to skip this section, and use the ‘Manage unsorted content’ link at the top to assign multiple results to events at once. However, if you did not have a specific page on your site for a result, but just uploaded a PDF (or other format), then you will definitely need to use this section of the site to attach the result to the event.
- You can add result pages by typing the title into the autocomplete (see below) and then specifying the date of the event (If you are not sure of the exact date, the month will do).
- Attaching PDF files: The pdf is probably already uploaded and you can use the browse to navigate to your country folder and select the pdf. If you add more than one past result – it will remember the folder where you got the last PDF from, which should speed up the process a bit.
 2. Uploading a pdf