Table of contents:
- How to begin: Adding page and making basic changes • Images • Links
- Advanced features of the text editor: Headings • Templates • Styles • Tables
- Other page options: URL of page • Author
How to begin
A good goal at the beginning is to successfully create a page or edit an existing page, and save your changes. Then you can move on to adding links and images.
- You can add a page by clicking ‘Add page’ in the grey bar. (You can also start by pressing the ‘Edit’ button for an existing page)
- You will then come to an edit page, containing a text editor with a Microsoft-word like interface
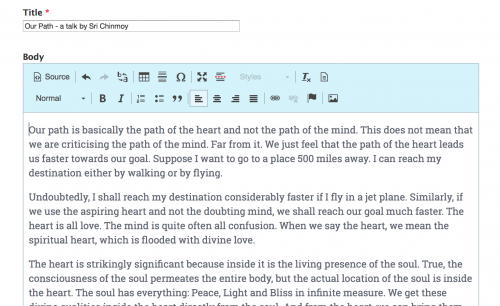
The edit page, showing title and text editor
If you hold the cursor over each button, you can see a short description of what that button does.
The obvious buttons
 bold and italic
 Aligning text – left, right, centre and justified
Tip: Pressing Enter will give you a new paragraph. If you want a line break instead of a new paragraph, press Shift + Enter at the same time blockquote – good for highlighting quotes and making them stand out from the rest of the text.
Tip: you can make the quote author appear in special text inside a blockquote by making it bold
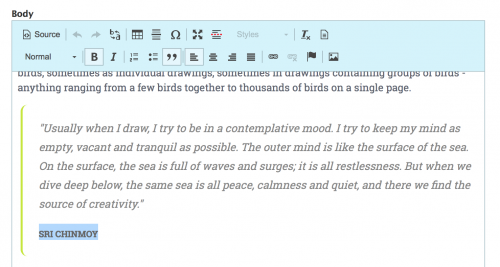
A blockquote. Note how the authors name is styles seperately by making it bold
Adding links – a simple guide
- Press the link button

- Add the URL of the page you want to link to. We often find it handy to open the page you are linking to on a seperate tab, so you can easily copy and paste the URL.
- To remove a link, highlight the link and press the ‘remove link’ button

- More advanced: You can also press Browse server to link to files or images (more on that here…) or you can add anchor links (links that go to different parts of the page) using the anchor button
 – find out more…
Add image – simple guide
- Press the image button
 and then press Browse Server to add an image
 - A new window will pop up containing the filesystem of all the images. To upload an image, press ‘Upload’ and select the image
- Then you go back to the previous dialogue, where you can choose to align the image to left or right, or add a caption
- To edit an existing image, right-click on it and select ‘Image properties’
- For more advanced information on adding and editing images, press here…
More advanced features of text editor
-
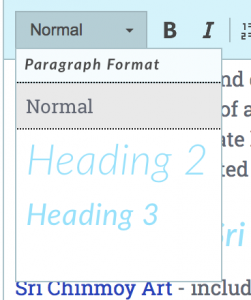
Heading selection
Format This is where we we can create page headers, which are good for breaking up long articles and making them comprehensible to the users.
There are two types of headers – Heading 2 for main headers etc, and Heading 3 is for subheaders. (In case you were wondering, Heading 1 is the page title)
Important note: This is not the option you choose if you want bigger text! Search engines expect text marked as headers to be exactly that, so putting all the text on the site as headers just for the sake of bigger text will definitely affect SEO (as well as making the page look pretty ugly). - Tables can be useful for making arrangements of text and images/videos. For more information, see this page…
- Style Right now, this will appear when you click inside a table or a link. Using the dropdown menu, you add more styling to tables, and also convert a link into a button.
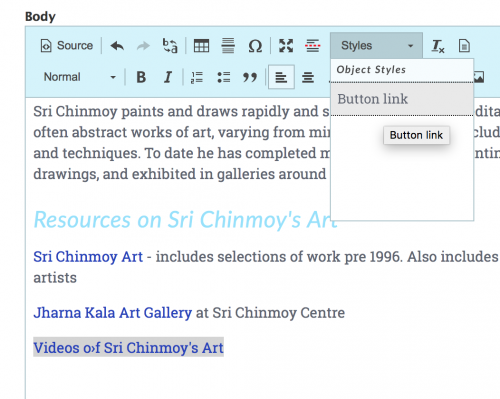
The style dropdown with a link, with the option to convert to a button
There is also a ‘remove formatting button’
 which will remove any styles you have added.
 - Read more
 This will add a separator that divides the text in two. This currently is useful for news items and books:
– For news items, the text above the readmore separator will appear initially on the /news page, followed by a ‘read more’ button. Pressing that button will reveal the rest of the text
– For books, the text below the readmore separator will go on the right hand side of the books page. This is typically the information for how to buy the book. - Templates An easy way to add nice features to the your page. Pressing the template button
 (the last button in the first row) will present a menu of news/story/video/book listings, fullwidth image layouts, maps, member profiles and other things you can add.
Once you select an item, the relevant shortcode will be added to the page, which you can then modify to your liking. - Anchor links For large pages, it can be good to be able get to different parts of the page quickly. A good example of such a page is the About is page on the global site, which has a table of contents at the beginning which contains anchor links to the various sections of the site.To make a link to a particular point in a page, first we need to set an ‘anchor’ – go to that point in that page and press the anchor button
 . You can specify a name for the anchor – we recommend it be lower case and without spaces.
Then to set the link, press the link button and select ‘Link to anchor in the text’ – the anchor you set should be available in the options.
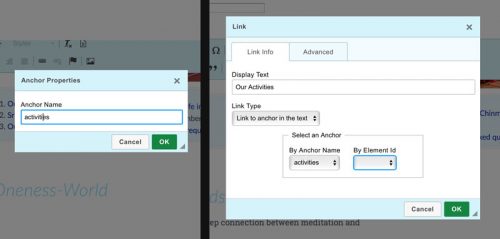
Left: setting the anchor name. Right: Linking to the anchor
- Undo and redo

- Search and replace text

- Source This button displays the HTML code of the page. Note that the text editor will strip out superflous styles and elements, so bear that in mind when trying to modify the HTML directly.
Page options below the text editor
- Putting pages in their right location in the site. Pages and stories exist in a folder-like structure of parent and child pages. You can decide where your page appears in this structure using the ‘Book Outline’ tab. By default, the parent page is set to be the page you were on when you clicked the create new page link. If you were in an admin page when you clicked the create new page link the parent page by default is set to the country home page.
(On a practical level, it might be better to rearrange the whole structure of the site by going to the front page and clicking ‘rearrange child pages’ in the grey bar) - Creating the page URL When creating a page, the page URL is automatically based on the title – however this can be overridden. A pithy URL that contains the essential words is better for SEO.
To set the alias manually, go to URL alias in the tabs below the check editor. Uncheck ‘automatic alias’ and just type in the URL that you want. (important: dont leave trailing slash at front of page)
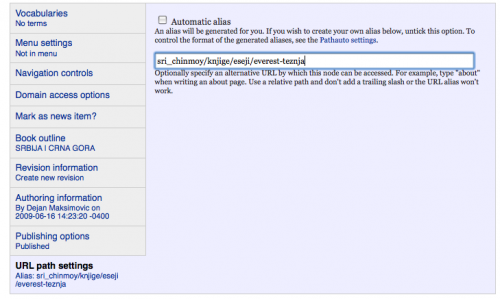 Note: right now the site will transcribe the non-Roman URLs into phonetic Roman letters. You may want to set a more appropriate URL manually.
